DIY FUME EXTRACTOR WITH OFF THE SHELF PARTS
It's been a while since I've made a blog post. Thought this DIY I put together could help some people get a decent working fume extractor together for their laser cutter without killing their wallet or a HAZMAT team at their door.
After receiving a Black and Red Chinese 80watt laser cutter / engraver, it became evident I needed a better solution then just exhausting it out the basement window. The only place I had to put it was 20 feet from the window, and after doing a few test cuts of baltic birch I noticed I needed an stronger exhaust fan and also a filter box as close to the unit as possible. I managed to make a "fairly" inexpensive Fume Extractor that works much better then I has anticipated. The assembly is relatively easy and took me about an hour from start to finish. Here's hoping this project can help others in eliminating the smell of burning wood and acrylic.
What you'll need:
- IRIS Airtight Pet Food Container - link $30
- BLUE 6" 152mm Inlet Short Truck Air Intake Cone Replacement Quality Dry Air Filter - link $21
- VIVOSUN 2-Pack 6 Inch 8 Feet Non-Insulated Flex Air Aluminum Ducting for HVAC Ventilation, 4 Clamps Included - link $16
- HORUSDY Hole Saw Set, 17 Pcs Hole Saw Kit - link $27
- AC Infinity Air Carbon Filter 6" with Premium Australian Virgin Charcoal - link $65
- VIVOHOME 6 Inch 395 CFM Black Round Exhaust Inline Duct Fan - link $90
- Duct Connector Flange, Plastic Straight Pipe Flange for Heating Cooling Ventilation System (6'' Inch Round) - link $12
- Lambro #246 6" Aluminum Duct Connector - link $7
Total Cost: $268.00
I chose to use the airtight food container as a start for my box. I didn't have any large scraps of plywood on hand, and figured I'd go with everything sourced from Amazon..
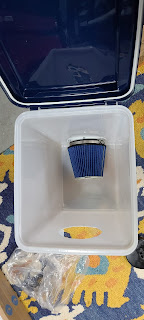
The first thing I did was locate where the intake prefilter would go (the short truck air intake). I drilled a 6 inch hold and mounted the duct flange. I then attached the prefilter on the inside of the box. I put some silicone sealant around the flange just to be sure everything was still air tight.
The next step was to locate the hole for the activated carbon filter. I had to place that up at the top of the box due to its large size. At first it looks like it wont quite fit, once the hole is there you can slide it down until the filter flange pops through the hole.
I also placed the prefilter it came with on it. I used a small piece of foam on the other end to hold it perpendicular to the hole. You may need to play around with this to get a flat fit on the flange side. I then applied a liberal amount of silicone sealant here also.
I then inserted the inline blower fan at the exit point (carbon filter), so it "pulls" the air out of the box.
When connected to the Laser Cutter and routed out the window, its actually very quiet. My air assist pump was noisier then the inline fan. I proceeded to run a few projects on the cutter and didn't detect a trace of burnt wood. I will be trying some acrylic later and will provide more updates.
Overall I'm very pleased with this setup. Any questions or comments would be greatly appreciated, I'm sure there's many improvements or cost saving approaches I didn't even think of.


Hãy mua vé máy bay đi Mỹ khám phá mùa hoa Anh đào ở Mỹ thường bắt đầu từ tháng 3 đến tháng 5 hằng năm, đặc biệt nở rộ vào tháng 4. Vì vậy để có cơ hội ngắm hoa Anh đào trên đất Mỹ thì mọi người nên chọn thời điểm này để đi để tận hưởng những khoảnh khắc đẹp nhất.
ReplyDeleteCó thể nói rằng đây là thời điểm khí hậu ở Mỹ dễ chịu nhất trong năm. Thời tiết không quá rét cũng không quá nóng bức sẽ khiến chuyến du xuân của bạn trở nên tuyệt vời hơn.
Vé máy bay đi Dallas: https://unitedairlines-vn.com/ve-may-bay-di-dallas .