Do It Your Goddamn Self Hydroponic Garden
Lester was an average man of slim yet tall stature. His long curly hair lent strongly to the image of a pot smoker. When the word hydroponics would leave his lips in conversation, the first thing people would imagine is him growing pot to support his habit. But Lester just wanted to grow some fucking vegetables, fruits, and maybe some nice herbs he can put in his shitty tomato sauce only he seems to like.
Lester needed something he could have out of the way, be convenient, and not make the yard a dump only the alcohol enthusiasts at the liquor store down the street would be proud of. He also needed to avoid long and wordy run on sentences that annoy the living shit out of him.
So one uneventful day at work he decided to get off his lazy ass and stop by Home Depot and the local hydroponic store for supplies to get started.
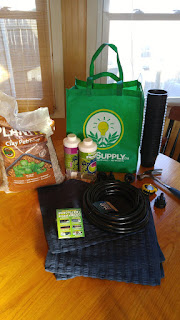
He gently loaded three 4" diameter PVC pipes into his smallish SUV. Being 10' long he had to figure out how not to let one loose on the highway and impale any unsuspecting passer by's. He also bought six 4" end caps and hangars. His list written in chicken scratch looked a little like this, except unreadable by 60% of the population:
3 - 4" Diameter PVC Pipes 10 foot length
Gradually accelerating the car off of the next exit, he sped towards the local hydroponics store. When entering this gleaming metropolis of growing shit, he was greeted by the cashier. After telling of his loose plans for growing stuff he walked out with a couple bags, one of them was a bunch of free samples!
24 - 3.75" grow baskets
1 - Bag of free samples (required!)
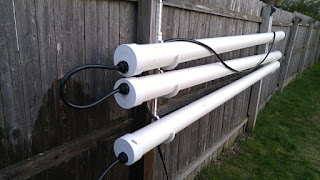
Lester decided a good place to mount the 4" diameter pipes of growing, would be between two fence posts. Like so....
Each pipe was tilted at an angle to allow the solution to travel fairly quickly to allow the roots to absorb nutrient and passively oxygenate the water through agitation. But in the mind of our main character, he just thought it would irk the shit out of people who can't help but notice they're not perfectly straight across.
With his rusty hole saw, he drilled the end caps and put in the barbed hose hookups like a champ.
Depressingly, it turned out Lester didn't pay much attention to the inside lip that runs around the endcap, making it a bitch to get a good seal. Silicone caulk to the rescue! His name should've been Jerry Riggs.
Now it was time to waste an hour searching for a 3.5" hole saw to cut out the basket holes. After wasting an hour or two, he then went down to the local hardware store and bought one.
He actually drew a line with his trusty marker so it wouldn't come out looking like a 2 year old made it.
Instead it came out looking like maybe age 7+. Perfectly acceptable.
Wanting to impress his wife and not get divorced because the backyard is starting to look like his workshop; Lester decided to buy a new deckbox. This new deckbox (on sale of course) would replace the existing one. Holding such wonderful things such as cushions of the patio set, and random odds and ends that don't belong in it. The one it replaced would then be retasked to perform a much more important job. A job no normal deck box has the privilege perform.
Hold all the ugly shit.
See that pump, that's going in the deck box!
After having a plan to hide the sins of this project, he went ahead and cut the holes in a 20 gallon tote.
Lester labored intensely over this tote. He even made labels that don't stick because the backing on them sucks ass. He made a drain hole, a PH up/down hole, pump wire and water out hole. The black plate is for mounting the two peristaltic dosing pumps to pump in PH up and down solution to keep things in balance for the sensitive little baby plants. The plate got scrapped because it was a douche idea with a much better one around the corner.
The pump used was:
The PH up/down solution was:
Atlas Scientific PH up/down
Atlas Scientific PH up/down
And 10' of silicone tubing.
The electronics are as follows:
1 - Arduino MEGA 2560
1 - 4.3" TFT LCD Touchscreen
1 - Real Time Clock with CR2032 battery
1 - 4 relay opto isolated switch board
1 - Rain Sensor
1 - 12 V Air Bubbler (for large container)
1 - PH Probe for Arduino (theres an industrial version too that will last longer)
1 - DHT11 Temperature / Humidity Sensor
2 - Waterproof Temperature Probe (for the water bin)
2 - Liquid Level float switch
1 - MDF board, 3/4" Thick
1 - 12 Volt water pump (I suggest getting a water filter too)
1 - Thunderbolt Magnum Solar 45Watt setup that usually goes on sale at HarborFrieght for $125-135.
1 - 12 volt 33 Ah battery
I am currently working on the layout diagrams and schematics. I will post as soon as I have finished. Please check back regularly for updates! :)


Mounted the legs with 1" 80/20 Extruded Aluminum I had laying around.
Notice the Air line fits perfectly into the T slot in the aluminum. I also routed the water temperature sensor through the same method.
The other temperature sensor is zip tied to the motor. I decided I wanted to lower the chance of burning my house down and waiting years for the insurance money.
I put some thermal grease on it to be sure it was reading somewhat close to the actual temperature.
The air stones will just hang out at the bottom.
I drilled some holes for the low water and overflow sensors. I made sure they were barely large enough to fit them through. To be sure the silicone gasket and get it's sealing on.
UPDATE: 7/13/2016
Now that there's more traffic to the blog after the friendly Hackaday post; it's really lit a fire under my ass to post more information and refine the design. As always I appreciate any feedback.
Currently, I'm fixing some software and wiring issues. My relay control signals aren't making it the 4 shitty inches or so to the relay driver board. It's like there's a strong 50 ohm pull up on these lines. I suspect a solder short or ground plane short in the level shifter board I used for the TFT display... I plan on fixing that soon.
In the meanwhile here a pic of the babies I'm getting ready for the main system.
I drilled a crap ton of holes in a 32 gallon tote and filled it with 1/4 strength hydroponic solution. They seem to really like it. I have a solar bubbler keeping it oxygenated.
More Recent Photos
All settings are adjustable and can be saved to EEPROM so that they are restored on reboot.
SYSTEM TIMING:
Current Settings are as follows for the Water AND Air bubbler
10 Minutes on (allows complete saturation of all pipes with 8 minutes of flow after saturation)
30 Minutes off (allows 4 minutes to drain, and 26 minutes of idle time)
Some people do equal times on and off, however with a solar system I wanted to decrease the duty cycle so that it wouldn't just die in the middle of the night.
SYSTEM FAULTS:
The system is interrupted and a warning is issued to the screen under the following conditions:
-Tank Empty switch active
-Motor temp exceeds 140 deg F
-Water temp exceeds 120 deg F
-PH meter fault (min or max reading)
-PH adjustment unresponsive (4 PH up or down cycles without >0.4 Ph value change)
The air bubbler function will continue despite any fault conditions. Nobody likes stagnant water.
TDS Sensor (potential)
As a "side" side project I'm hoping to figure out how to interface to this TDS-3 unit to get the dissolved solid reading. I have two more peristaltic pumps I'll throw on to keep the nutrient concentration level. No guarantees on this one though.
Time to pull out the oscilloscope. Maybe there's a serial stream coming out, or even a voltage value that scales to the reading. The bottom fat pin is the temp sensor.
PRELIMINARY SYSTEM DIAGRAM
Any Bitcoin donations would be greatly appreciated, and help fund any current & future projects.


